Having problems doing the installation of your VEVOR Wheel Stand? Is it not straightforward how to assemble the product? No worries. Many gamers face this challenge when assembling game accessories. But fear not! This guide makes things easy for you. You will get insights on the step-by-step setup process. In no time, you will have your VEVOR Wheel Stand set and ready to play with simple-to-follow VEVOR Wheel Stand instructions. Let’s get started!
Table of contents
Experience Ultimate Gaming Control with VEVOR Wheel Stand
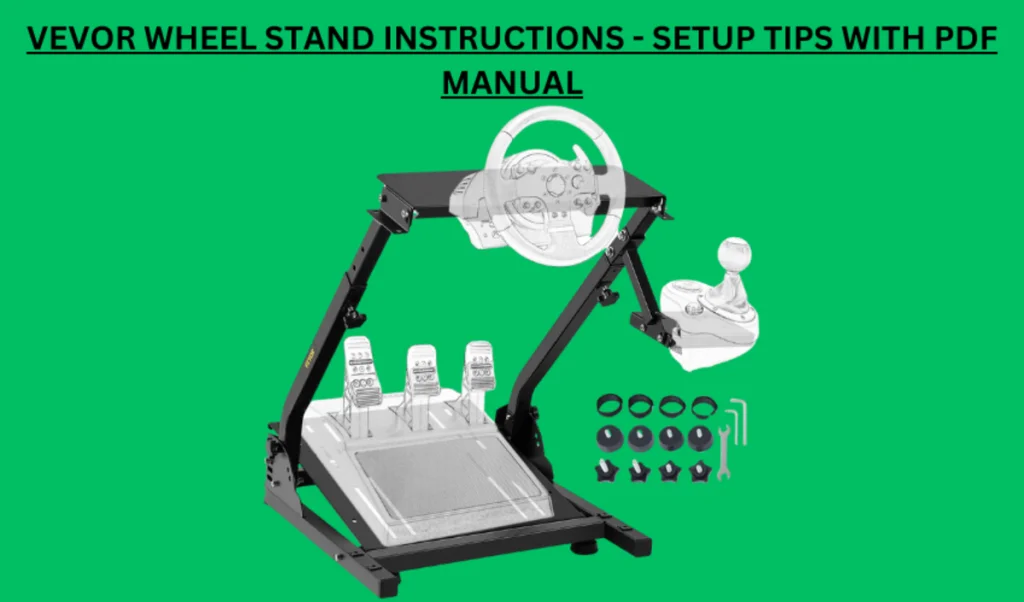
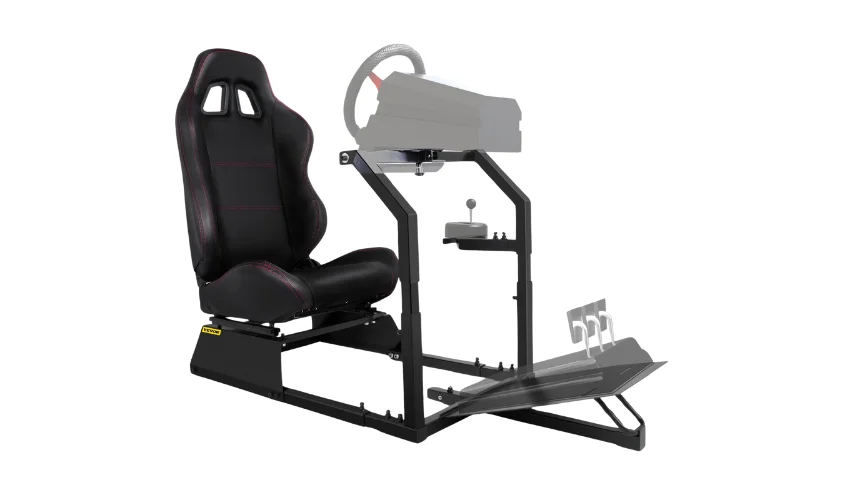
Get the VEVOR G920 Racing Steering Wheel Stand and change your gaming experience. This stand is perfectly engineered and compatible with Logitech G27, G25, and G29 gaming wheels. Easily attach your wheel and shifter to set up your racing rig.
Universal Compatibility
Easily mount all your racing gear. Compatible with Logitech G25, G27, G29, G920, Thrustmaster T300RS, TX F458, T500RS, T3PA-PRO (F1/GT), Fanatec Clubsport and Simcube; and Thrustmaster and CSR pedals. (Note: Wheel, shifter, and pedals are NOT included.)
Fully Adjustable
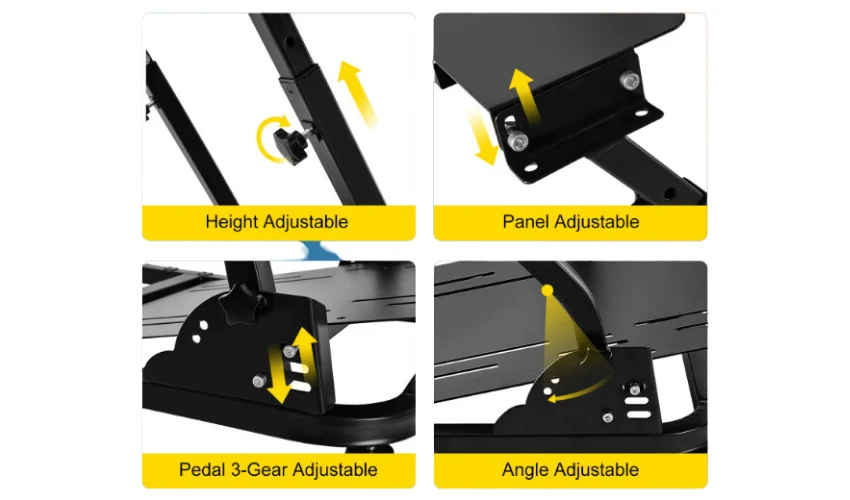
Customize your set-up to the extreme. Set the angle and height (27″-31.5″/68.5-80 cm) for the final driving pleasure. Tailor wheel and pedal plate locations for ergonomic convenience and adaptability.
Built to Last
Experience stability and durability that you will never have known before. Made from high-strength carbon steel, it guarantees a lifetime of operation. The rubber pads of every support point add safety.
Foldable & Portable
Maximise space and convenience. Collapse the stand to fit logically under furniture or in cramped spaces. It is ideal for gamers with space restrictions. Take the setup everywhere.
Versatile Shifter Holder
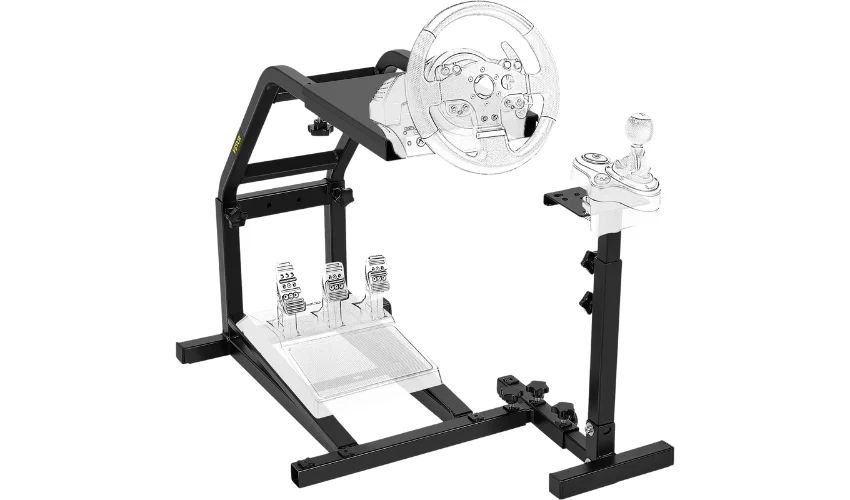
Adjust quickly to your choice. The gear shifter holder is flexible: it can be placed on either side for left or right-handed players. Pre-drilled holes make the installation more accessible for an effectively seamless mount.
| Sr. No. | Parameter | Specs | Parameter | Specs |
| 1 | Model | G920ZDJ | Material | Carbon Steel |
| 2 | Adjustable Height | 27″-31.5″/68.5-80 cm | Base Size (LxW) | 18.9″x22.6″/48×57.5cm |
| 3 | Wheel Holder Size (Lx W) | 16.5″ x 5.9″/42 x 15 cm | Shifter Holder Size (Lx W) | 6.3″ x 4.7″/16 X 12 cm |
| 4 | Folding Size (L | 18.9″ X 30.3″ X 7.5″/48 X 77 X 19 cm | Product Weight | 24.9 Ibs/ 11.3 kg |
| 5 | Compatible Model | Logitech G25, G27, G29, G920; | ||
| 6 | Thrustmaster T300RS, TX F458, T500RS, T3PA-PRO (F1/GT) pedals; | Fanatec Clubsport & Simcube & Thrustmaster CSR pedals |
VEVOR Wheel Stand Instructions – Step By Step
To effectively and properly set VEVOR wheel stand you need to follow a step-by-step procedure. The following section will assist in this regard. Get familiar with the step-by-step process to set up the VEVOR wheel stand down below:
1) Unboxing and Inspection
The first thing you should do when you get your VEVOR Steering Wheel Stand is to take it out of the package and check what is inside. Thoroughly examine the pack to ensure all elements specified in the manual are in it. Check for the main stand, mounting brackets, if included, shifter holder, screws, and any extra accessories included in the manual. Control of the contents allows all necessary details for assembly and almost eliminates the risk of non-arriving packages.
2) Tools Requirements
Compile all the required tools before commencing the assembly process. The tools needed might consist of a Phillips head screwdriver, an adjustable wrench, or Allen keys, as per the particular model of the VEVOR Steering Wheel Stand. Consult the manual for the complete list of tools required for the assembly. An appropriate set of tools will ensure an easy and quick assembly.
3) Pre-Assembly Preparation
Prepare for assembly by completing a few essential pre-assembly steps:
Selecting Proper Assembling Area:
Choose the place with as much light and free space as possible for your VEVOR Steering Wheel Stand assembly. Provide enough space to move around the stand during the assembly. When the work area is cleared, the chances of accidents are low, and all components can be reached easily.
Cross-Check Pedals and Wheel Compatibility:
Before assembly, ensure your gaming wheel and pedals are compatible with the VEVOR Steering Wheel Stand. Please consult the manual or product description for the model list that is compatible. Ensure that the measurements and mounting choices match your gaming equipment to prevent further compatibility issues.
Familiarise yourself with the components:
Spare some time to get acquainted with every VEVOR Steering Wheel Stand component. Check the assembly manual and describe each part, including its purpose and location in the global assembly. Forefront knowledge of the components will make the assembly process much faster.
4) Detailed Instructions for Each Assembly Step
The following section throws light on the assembly process stepwise:
At first, you need to lock the pedal and base of the bracket with the help of screws. On the front side, you need to use the M8×56mm bolts, while on the other part, you need to use the M8×36mm bolts.
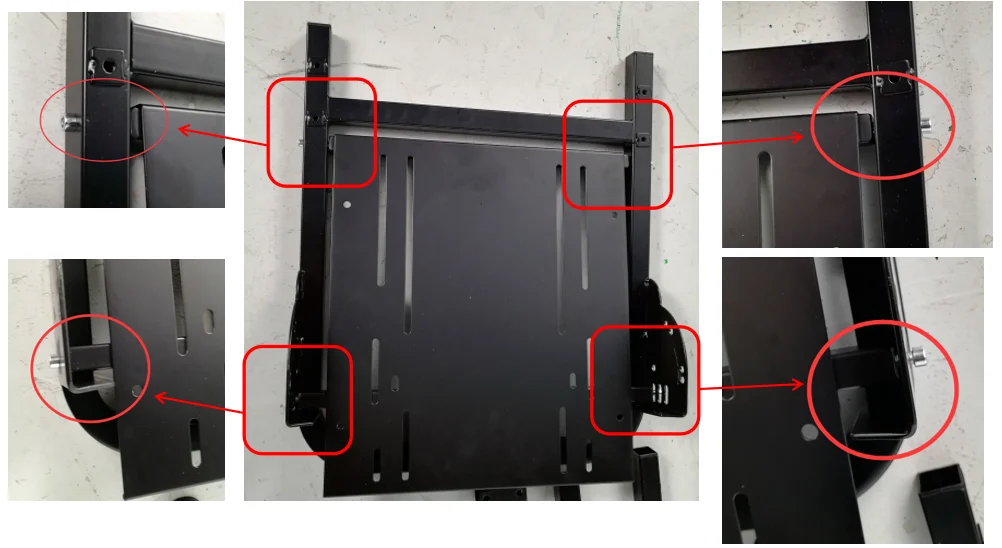
Later, setup the rod using the 2 M8×60mm plastic screws. After that, lock in the side with the help of 2 M8×56mm screws.
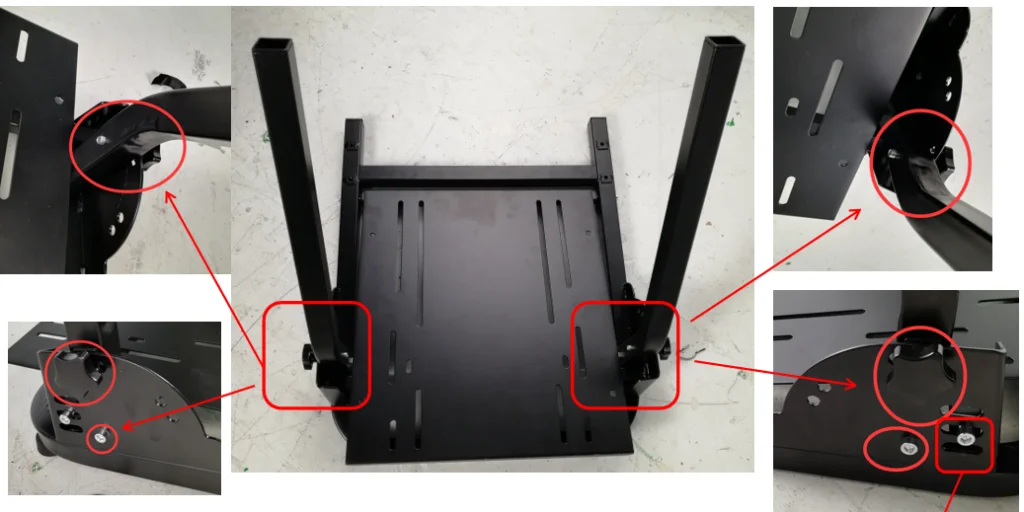
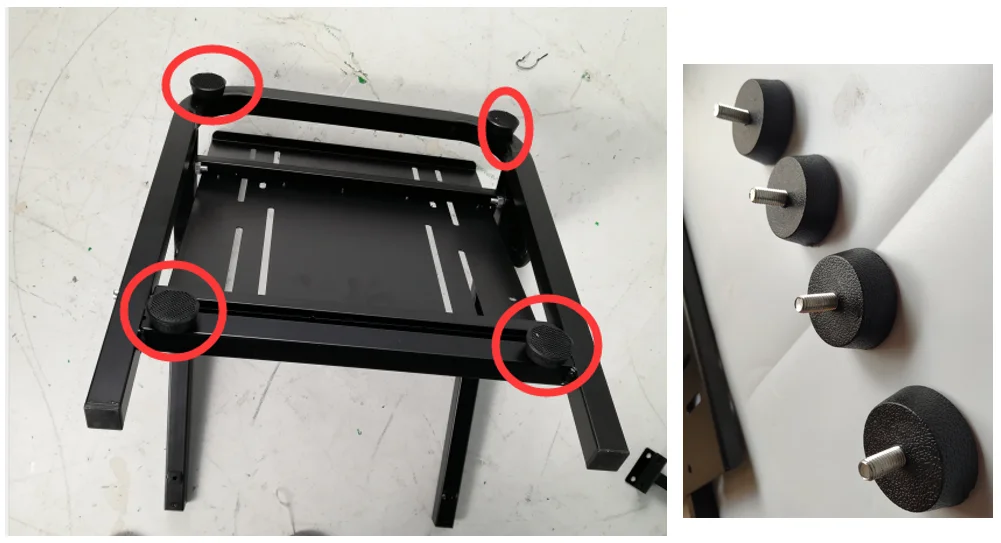
In the third step, you need to fix the bracket using the M8 4 antiskid foot screws. Please note you can adjust the height of the screws as per your requirement.
Fourthly, setup the telescopic brackets using the inner holes and fix them in place. You can use the M8×34mm plastic screws on either side. The telescopic bracket allows you to adjust it as per your suitability.
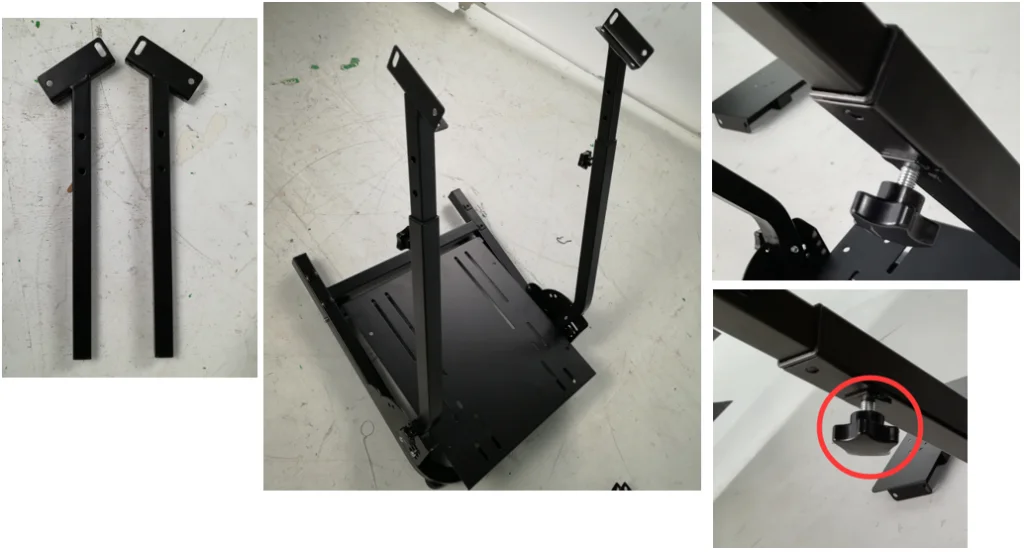
Now, fix the table using the telescopic bracket holes. For this purpose, 4 M8×22mm screws assist in this regard. Nuts facilitate in fixing of these screws in place.
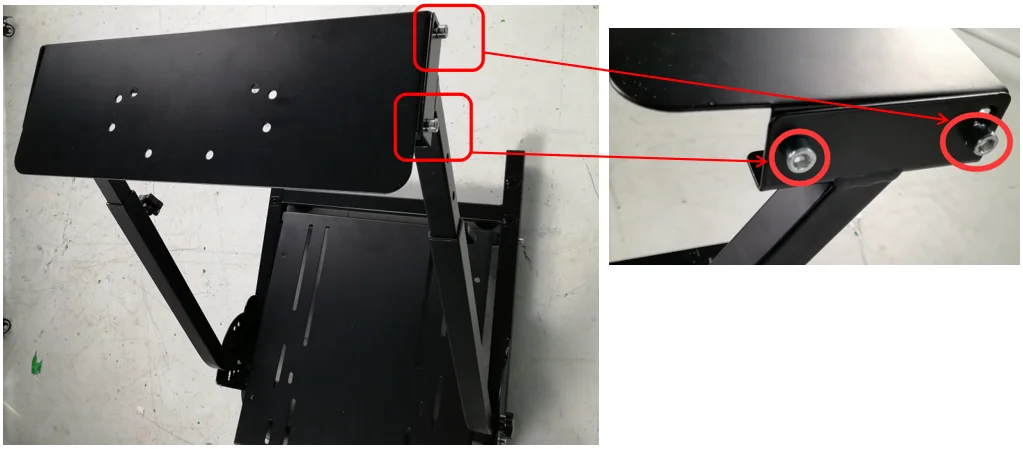
Install the gear shifting bracket using the 2 M8×40mm screws directly on the telescopic bracket. Using the nuts fix in this bracket. You can mount or fix the gear table bracket on the right as well as the left side as per your requirements.
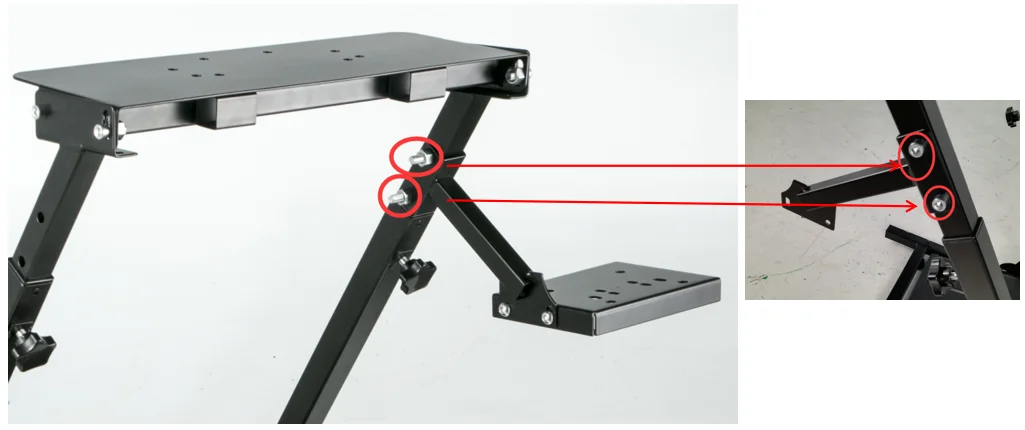
Lastly, using the M6 bolts, you can fix up the gear shifting support on the gear shifting bracket.
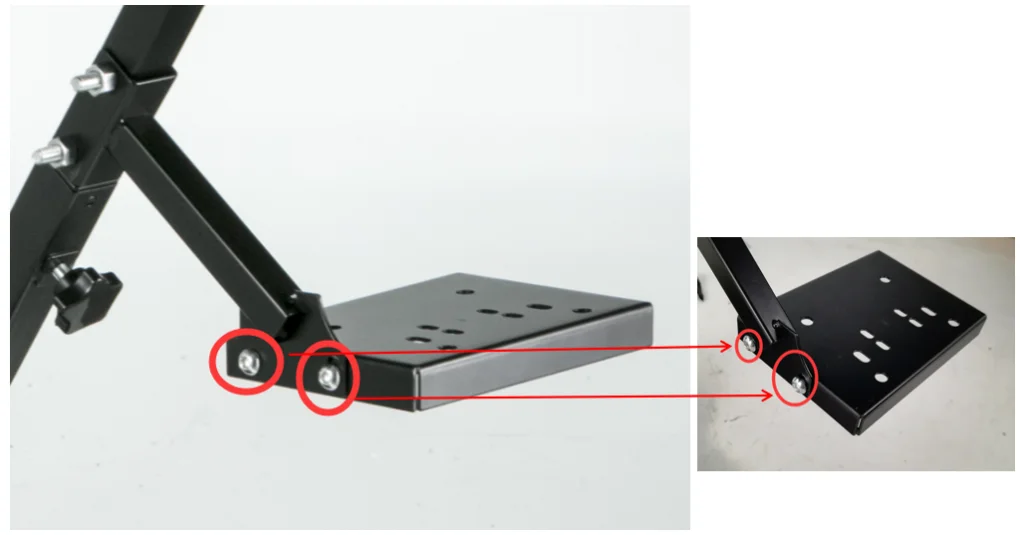
This way, you can completely set up your VEVOR wheel stand.
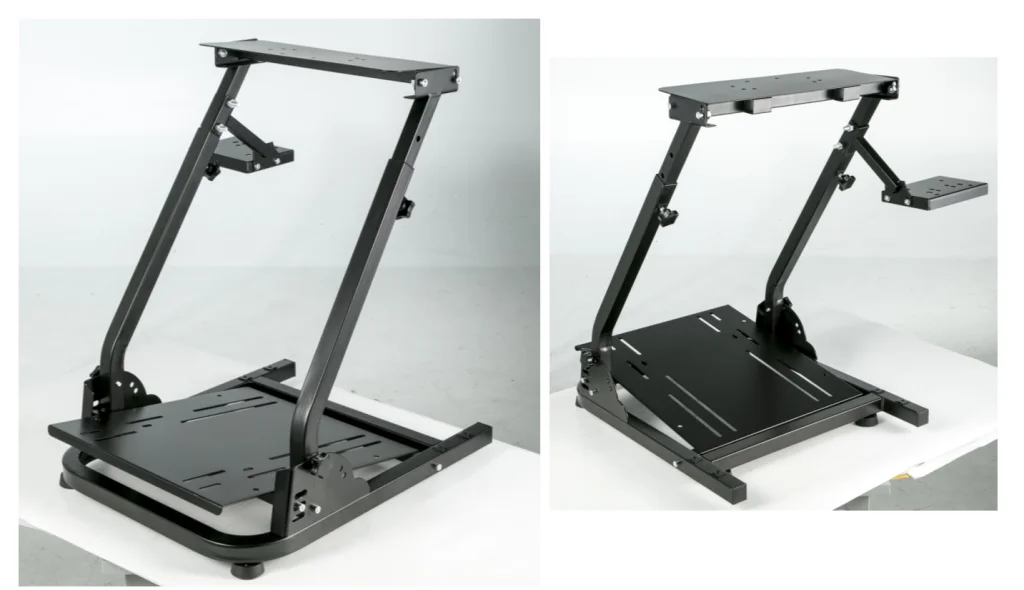
5) Adjustability Instructions
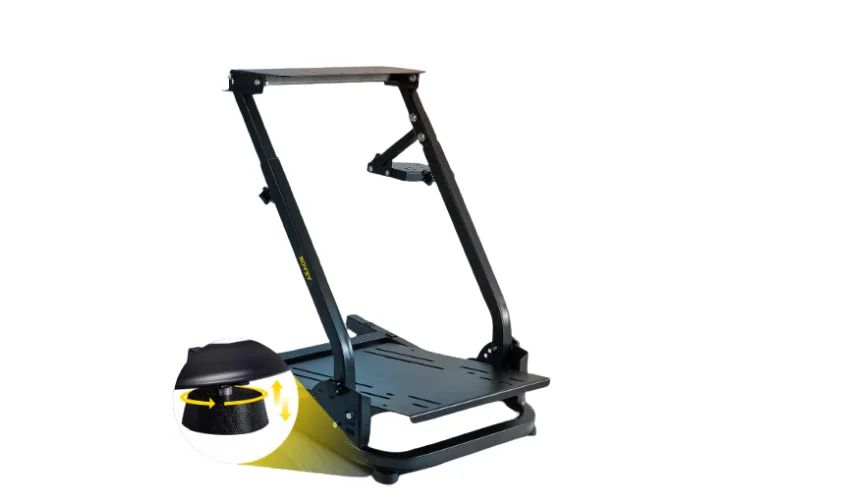
It’s a piece of cake to set your VEVOR Steering Wheel Stand. You just use the knobs that are given for adjustments in height, angle and other settings as per your liking. The ideal position for your gaming requirements can be found within a height range of 27” to 31.5″ (68.5-80cm). If you need to have a higher angle to see better or a lower angle for better, this stand gives you the flexibility to suit your preferences.
Critical Considerations While Carrying Out VEVOR Steering Wheel Stand Instructions
While setting up the VEVOR wheel stand, you need to focus on multiple things for a successful setup. The notable ones for your reference are:
1) Considerations Before Assembly:
Ensure a smooth setup process by addressing the following points before tackling into assembly:
- Compatibility of Model: Check the compatibility of your VEVOR Steering Wheel Stand with your gaming wheel model to ensure the fit and the proper functioning.
- Working Area and Tools: Collect all the required tools and ensure you have enough space to assemble the stand comfortably. This consists of screwdrivers, spanners, and any other tools indicated by the manual.
- Getting Familiar With Manual: Spend time studying the instruction manual in detail. Study the instructions and pictures to simplify the operation.
2) Considerations During Assembly:
- Components Identification: Before connecting any part, determine each detail with the help of the graphics in the manual or the appropriate label. It will avoid confusion and guarantee the correct location.
- Tightening Up Screws: Construct the stand, paying attention that all bolts are tight. Prevent overtightening, as this can easily damage threads and components.
- Align Your Components: Keep the components correctly positioned when constructing the stand. Misaligned parts will lead to instability or disrupt the operation of your gaming wheel.
- Avoid Cable Tangling: As you assemble the stand, organise cables neatly to avoid tangling with other wires or interference with the moving parts. Use cable ties or clips to hold the wires in position.
- Model-Specific Instructions: Obey any model-specific instructions present in the manual. Such instructions may contain extra measures or modifications required for your specific game wheel model.
FAQs
The common questions that most people ask about or in relation to wheel stands are as follows:
What is the process of getting my Logitech wheel connected to my computer?
To connect your Logitech wheel to the computer, you will need drivers installed. Afterwards, connect the wheel to your computer through USB. When plugged in, your computer should automatically detect the wheel. You might have to change specific game settings to ensure the wheel is correctly set.
Will the wheels work on PS5?
Indeed, many race wheels work with the PS5. Nevertheless, the compatibility may differ by wheel model and necessary firmware updates. Contact the manufacturer or review the PS5 compatibility list to ensure your wheel is supported.
How do I connect my steering wheel with my PS4?
Attach your steering wheel to your PS4 by plugging it into the console using USB. Make sure the wheel is on and detected by the PS4. Some setting changes in the game may be required to set the wheel upright, thus making it work properly. See your wheel’s user manual for guidance on how to connect to a controller on a PS4.
Conclusion
To sum up, now you have the information necessary to control your gaming setup using the VEVOR Wheel Stand Instructions. Exercise the control over your gaming experience by reflecting on these hints. Feel free to operationalise the VEVOR Wheel Stand Instructions for better utilisation. All set to upgrade your gaming station? Browse VEVOR’s product range today and select the suitable wheel stand. With VEVOR, turn your gaming into interactive experiences. Now, let your gaming rig be what it was created to be.

