Do you know it sometimes takes an hour to detangle a knotted mess of an extension cord? Tangled extension cords are frustrating; who likes to deal with damaged wires? Wrapping an extension cord like a pro doesn’t require any degree. Some simple and effective tips can do the job.
In this guide, we’ll share some great techniques for wrapping an extension cord like a pro so you won’t have to face any issues in the future.
Wait before proceeding; check out the VEVOR extension cord reel, which makes cord management much easier. Do not worry; we will also share its features, so stay with us and do not skip!
Table of contents
Why Proper Cord Wrapping Matters
Here’s why proper cord wrapping matters:
Avoiding Damage and Prolonging Lifespan
Wrong wrapping = knits and knots
Knits and knots are not only about detangling fuss but also damage wires from the inside, resulting in malfunction. When you wrap your cords correctly, keep the wire intact and working longer.
Ensuring Safety and Reducing Hazards
Frustration is a thing we can still bear, but tangled cords are dangerous and unmanageable. Loose cables can trip you up, and a cluttered space is an accident waiting to happen. By wrapping your cords neatly, you reduce these risks and make your home or workspace safer for everyone.
Easy Storage and Accessibility
One of the best perks of proper cord wrapping is its ease of storage and access. Neatly wrapped cords take up less space and are easy to find when needed. No more wasting time untangling cables; you can grab what you need and get to work.
How to Wrap an Extension Cord: 3 Effective Techniques
The three most effective wrapping techniques include:
- The Elbow Wrap
- The Braid Wrap
- The Over-Under Wrap
Each method provides a quick, secure, and efficient way to store cords.
The Elbow Wrap: Simple and Quick
The Elbow Wrap is straightforward and quick, perfect for a short-term storage solution. This technique involves wrapping the cord around your elbow and hand to create a neat coil.
Step-by-Step Guide
- Hold One End: Hold one end of the extension cord in your non-dominant hand.
- Create a Loop: Extend your arm slightly and bring the cord across your chest, wrapping it around your elbow and then back into your hand.
- Continue Wrapping: Repeat this motion, forming cord loops as you go. Ensure that the loops are consistent in size to maintain a neat coil.
- Secure the End: Once the entire cord is wrapped, tuck the loose end through the center of the coil, securing the loops together.
Benefits
Quick and Easy
- Need to wrap up and go? The Elbow Wrap has you covered.
- Perfect for those short cords you reach for often.
Ideal for Temporary Storage
- Great for when you need a quick storage solution.
- Get your cords wrapped up in no time.
Best for Shorter Cords
- Works like a charm with shorter lengths.
- It can get tricky with longer cords.
The Braid Wrap: Secure and Compact
The Braid Wrap technique creates a secure, compact loop, making it ideal for medium-length cords. This method involves creating a series of knots or braids that keep the cord from tangling, providing a tidy and compact storage option.
Step-by-Step Guide
- Find the Center: Start by finding the midpoint of your extension cord. Hold this midpoint in one hand.
- Create a Loop: Form a small loop at the midpoint and fold the cord in half, holding both ends together.
- Begin Braiding: Braid the two lengths of cord together from the loop. This is done by forming loops with the doubled cord and pulling them through each other in a chain-like fashion.
- Continue to the End: Continue braiding until you reach the end of the cord. If the cord is long, you may need to repeat the process by folding the braided section in half and continuing to braid.
- Secure the End: Once the braid is complete, tuck the loose ends through the last loop to secure the braid.
Benefits
Compact Storage for Medium-Length Cords
- The Braid Wrap technique keeps your cords neat and compact, perfect for saving space.
No More Tangles
- Say goodbye to the frustration of tangled cords. This method ensures your cords stay tangle-free so that you can use them without hassle.
Easy to Unravel
- Your card is super easy to unravel when you need to use it.
Ideal for Small Spaces
- This technique is a game-changer if you work with limited storage space. It keeps your cords tidy and easily accessible without clutter.
Perfect for Frequent Use
- The Braid Wrap method offers quick and easy access for regular cords while keeping them neat and ready for action.
The Over-Under Wrap: The Pro’s Choice
The Over-Under Wrap is the preferred method among professionals because it is efficient and keeps cords tidy and ready for use. This technique minimizes twists and tangles, making it ideal for long cords and frequent use.
Step-by-Step Guide
- Hold One End: Hold one end of the extension cord in your non-dominant hand.
- Create the First Loop (Over): With your other hand, make a loop by bringing the cord over the top, forming a clockwise loop.
- Create the Second Loop (Under): Bring the cord under your hand for the next loop, forming a counterclockwise loop. This alternating pattern prevents the cord from developing twists.
- Repeat the Process: Continue alternating between over and under loops until the entire cord is wrapped. The loops should lie flat and even.
- Secure the End: Once wrapped, tuck the loose end through the center of the coil or secure it with a twist tie or Velcro strap.
Benefits
No More Twists and Tangles
- Say goodbye to frustrating twists and tangles, especially with those long cords.
- This method is a lifesaver for keeping your cords neat and easily managed.
Smooth Unraveling
- When you need to use your cord, it unravels smoothly without knots or kinks.
- Perfect for quick setups, saving you time and hassle.
Ideal for Frequent Use
- This technique is incredibly efficient if you’re constantly wrapping and unwrapping cords.
- Keep your workflow smooth and uninterrupted.
Professional Favorite
- Many pros in the industry swear by the Over-Under Wrap for its reliability.
- It’s a go-to method for those who need to manage their cords quickly and efficiently.
Mistakes to Avoid When Wrapping an Extension Cord
Properly wrapping your extension cord is essential, but it’s just as important to avoid common mistakes that can damage the cord or make it difficult to use.
Over-tightening the Cord
One of the most common mistakes is over-tightening the cord when wrapping it. This can compress the internal wires, leading to breaks or frayed areas over time. When the cables are damaged, the cord becomes less reliable and may pose a safety hazard. Always wrap the cord loosely enough to avoid putting excessive pressure on the internal components.
Wrapping in Tight Loops
Another mistake is wrapping the cord into tight, small loops. This can create kinks, which weaken the cord at specific points and make it more prone to internal damage. Tight loops also make it harder to unwind the cord smoothly. To avoid this, always wrap the cord in larger, more gentle loops that maintain the cord’s natural flexibility.
Not Using a Cord Reel
Lastly, neglecting to use a cord reel is a missed opportunity for convenience and safety. A cord reel, such as the VEVOR Extension Cord Reel, allows you to store your cord neatly while preventing tangles and reducing wear and tear. It also makes unwinding and rewinding the cord effortless, ensuring that your extension cord stays in excellent condition and is always ready for use.
Additional Tips for Cord Care
Taking good care of your extension cords extends their lifespan and ensures they remain safe and functional.
Store in a Cool, Dry Place
Heat and moisture can deteriorate the cord’s insulation, leading to cracks or brittleness over time. Always store your cords in a cool, dry place to prevent damage and keep them in optimal condition.
Avoid Extreme Temperatures
Extension cords are not designed for use in excessively hot or cold environments. Extreme temperatures can cause the insulation to degrade or become brittle, leading to failure or safety hazards. Always use your cords within the recommended temperature range.
Inspect for Damage Regularly
Before each use, inspect your extension cords for any signs of damage, such as cracks, fraying, or loose connections. Using a damaged cord can be dangerous, so replacing any cord that shows signs of wear is essential to maintain safety.
Recommended For Your Project
Consider a VEVOR Extension Cord Reel
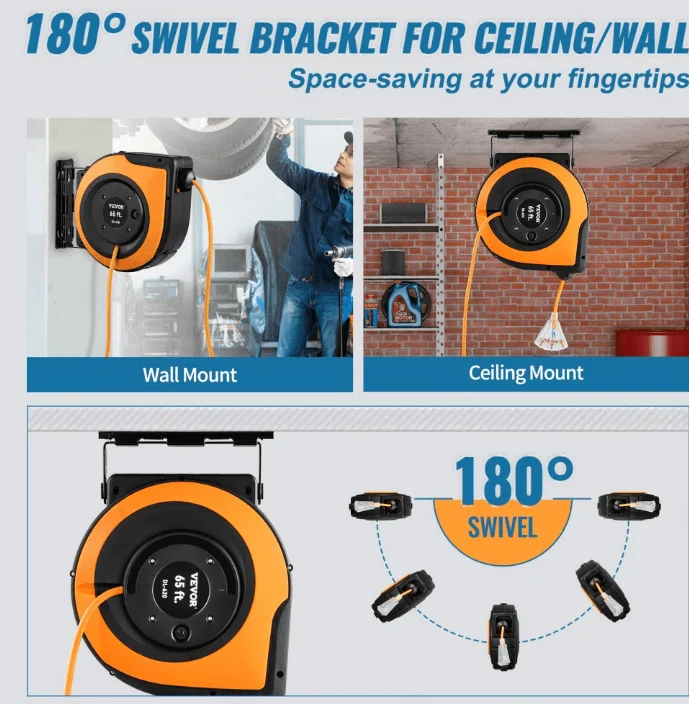
The VEVOR Extension Cord Reel offers a convenient and reliable solution for long-term storage. With features like automatic cord rewind and sturdy construction, it helps keep your cords organized, tangle-free, and ready for use whenever you need them.
The Bottom Line
Proper cord wrapping is essential for maintaining order in your workspace and prolonging the life of your extension cords. By avoiding common mistakes and adopting best practices, you can ensure that your cords remain in top condition and ready to use whenever needed. Whether you choose the Elbow Wrap for quick storage, the Braid Wrap for compactness, or the Over-Under Wrap for professional results, these techniques will help you avoid damage and tangles.
We encourage you to implement these methods to enjoy the benefits of longer-lasting, safer cords. For added convenience and to further protect your investment, consider using a VEVOR Extension Cord Reel. Its automatic cord rewind and durable construction make it an excellent addition to any toolkit, ensuring your cords are always neatly stored and easily accessible.