Raising your own chickens is a rewarding experience, but plucking them? Not so much, especially by hand. Plucking a chicken or two by hand can be fun, but when you have an entire poultry flock to process, plucking can be hand-numbing, time-consuming, and messy.
Enter the VEVOR chicken plucker, your poultry processing savior. No more messy, time-consuming, hand-numbing, plucking sessions. Equipped with soft yet sturdy plucking fingers, this innovative machine whirs away the feathers off your poultry, leaving you with clean, ready-to-cook birds in seconds. It can pluck six chickens in one minute. But before you spend your hard-earned money on this VEVOR plucker, you want to make sure that it is only the hype, or does this VEVOR plucker deliver on its promise of efficient chicken plucking?
In this comprehensive VEVOR chicken plucker review, we delve into its deets, exploring its features, functionality, and user experience. We’ll guide you through every feather-freeing stage from unboxing and assembly to step-by-step plucking tips. So, ditch manual plucking and prepare to discover how VEVOR chicken plucker can help take your poultry processing game to the next level.
Let’s get started!
Table of contents
Why Choose a VEVOR Chicken Plucker?
Besides the brand name, it is the unique features of the VEVOR chicken Plucker that make it the top choice over the plethora of options available. Below, we have discussed the key features that make it the perfect partner for your de-feathering needs.

Efficiency
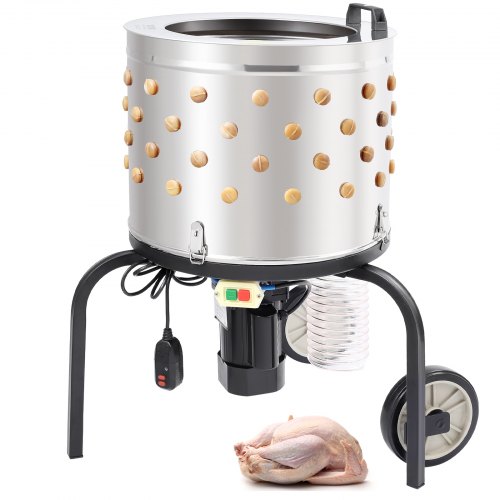
The VEVOR plucker boasts a powerful 550W motor, a speed of 280 RPM, and 108 soft, flexible fingers that work their magic on chickens, ducks, geese, and turkeys. Simply place the properly scalded bird in the rotating drum and witness the bird getting plucked in a matter of seconds (10 to 30) while keeping the skin intact. It can handle 2 to 4 chickens at one time and can pluck six chickens in one minute.
Stainless Steel
VEVOR is known for being mostly popular for two things—high affordability and the toughness of its tools. VEVOR chicken plucker is also not only very affordable compared to other brands but also very tough and durable. It features a premium 430 stainless steel drum that is rust-resistant, promising an extended lifespan.
Simple Debris Collection
This new VEVOR chicken plucker features an added hose to the drain outlet, which prevents water and debris from entering the motor and makes debris collection easier. You can simply put a bucket under the drain hose and collect the feathers and water coming out of the plucking chamber.
Compact and Portable
Space constraints or backyard operations? No worries! The VEVOR plucker’s compact design makes it perfect for both large and small processing areas. It features two large rubber wheels and a convenient handle, allowing you to take it wherever you need to pluck chickens. So, whether you are plucking chickens in a commercial kitchen, in an outdoor garden, or on a chicken farm, this plucking machine will be your trusted partner.
Easy Assembly and Maintenance
Fear not, DIY enthusiasts! The VEVOR plucker is designed for user-friendly assembly and maintenance. Clear instructions and readily available spare parts make keeping your plucker in tip-top shape a breeze. Also, the detachability of its stainless steel drum makes it super easy to clean. If the plucking fingers get damaged, you can easily replace them with the 10 extra plucking fingers that come with the package.

Unboxing the VEVOR Chicken Plucker
The VEVOR Chicken Plucker arrives nestled in a sea of Styrofoam, which is not good for your chickens. Therefore, make sure that you put away the Styrofoam packaging carefully, as you do not want your chickens to mistake it for a tasty treat.
As you open the box and remove the top layer of packaging material, you will find the plucking drum, inside which you will find the user manual, a bag containing all the nuts and bolts you will need for assembling. It also contains a spray nozzle and an Allen key.
Lift the plucking drum out, and beneath it will be another section of Styrofoam. In there, you will find a pair of rubber tires and three legs neatly tucked in Styrofoam.
Now that we are done unboxing let the adventure begin!
Assembling the VEVOR Chicken Plucker
After unboxing, read the user manual and take a moment to familiarize yourself with different parts of the plucker. Grab your tools, and follow these steps to assemble your VEVOR chicken plucker correctly:
1. Attaching Drain Hose
Begin the assembly by putting the plucking drum upside down. Then, using a flathead screwdriver, loosen the hose clamp on the drain hose and then attach it to the drainage flange.
2. Attaching Wheels to the Legs
Using pliers or a wrench, remove the bolt at the lower end of the leg, put on the tire, and then tighten the bolt. After tightening, check if the wheel is spinning freely. Now, put the other wheel on the other leg.
3. Putting Legs onto the Base
You will notice that the legs, as well as the leg section on the base of the drum, are numbered. When attaching legs, make sure that the leg number and that of the leg section correlate (the number 3 leg must go into the number 3 leg section). Now, find the nuts and bolts for the legs in the small bag that you found in the drum. Make sure you secure both mounting points for each leg.
4. Attaching the Handle:
After attaching the legs, you can go ahead and flip the whole unit over and stand it on its legs. You can secure the handle to the top of the drum using the small Allen key that came along with the package.
5. Test Run
Your VEVOR plucking machine is assembled. Next, connect the plug to the power supply and turn on the machine. Let it run for a while and observe if it is making any weird noise. If it seems to be working fine, you can go ahead and throw in a chicken for plucking.
Now that you have correctly assembled the chicken plucker let’s find out how you can use it to pluck chickens.
How to Use VEVOR Chicken Plucker Step-by-Step
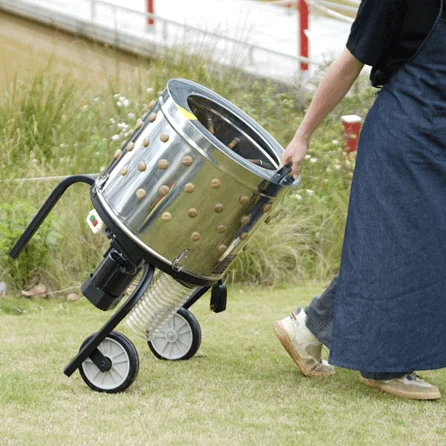
Your VEVOR Chicken Plucker is assembled and ready for action. Follow these step-by-step instructions to transform plucking from a dreaded chore to a seamless task:
- Prepping the Chicken
Before you put the chicken in the plucking chamber for plucking, make sure that it is properly scalded. Check our guide on chicken scalding temperature guide to make sure that you are not over-scalding your chickens.
- Put Chicken Into the Plucking Drum
Once the chicken is properly scalded, you can go ahead and put the chicken inside it and turn on its motor. The motor will start whirring the chicken around in the drum and the plucking fingers will do the magic, and your chicken will be bare naked in about 10 to 30 seconds. During this process, consider spraying water onto the chicken from the spray nozzle. The water spray helps lubricate the process and prevents bruising.
- Turn Off the Plucker and Remove the Chicken
Once the chicken starts to appear naked, turn off the machine, and as it stops spinning, remove the chicken. Look for any stubborn feathers and remove them with your hand. Also, consider spraying the plucked chickens with water to remove any feathers or dirt attached to them.
- Cleanup
Disconnect the plug from the power, detach the drum from the base, and spray with water to get rid of feathers or debris clinging to the walls or plucking fingers. Once thoroughly cleaned and dry, reassemble the drum for later use. When not planning on using the plucker for an extended period, store it in a dry, non-corrosive environment.
Tips for Effective Use
To ensure that your VEVOR chicken plucker is working at an optimum level—plucking 6 chickens in one minute—here are a few insightful tips for you:
- Finding the right scalding temperature and duration for your chickens. Aim for a temperature between 140°F and 150°F (60°C- 65°C) and dip chickens for about 30-60 seconds. Over-scalding can loosen the skin, while under-scalding won’t release feathers effectively. Experiment and find the sweet spot for perfect feather detachment.
- Do not unnecessarily pluck for too long. Plucking for too long can damage the skin or bruise the meat.
- Pluck remaining stubborn feathers by hand instead of over-plucking.
- Water provides the lubrication and smoothens the plucking process, but too much of it can be counterproductive.
- Replace any worn or damaged fingers promptly to maintain optimal performance.
- Clean your plucker thoroughly after each use. Remove leftover feathers and debris, wipe down the drum and components with a damp cloth, and allow it to air dry completely before storing.
FAQs about VEVOR Chicken Plucker
Q: Is VEVOR Suitable for Small-Scale Poultry Farms?
Absolutely! With its compact size, portability, and efficient operation, the VEVOR Chicken Plucker is ideal for small-scale poultry farms.
Q: How many chickens can a VEVOR chicken plucker pluck?
VEVOR chicken plucker can handle up to 2 to 4 chickens simultaneously and can pluck up to 6 chickens in one minute.
Q: Can you put a turkey in a chicken plucker?
It is recommended to use no more than 11 pounds (5kg) of turkey at a time.
Conclusion
Gone are the days of hand-plucking nightmares. With VEVOR Chicken Plucker 2.0, you can transform your once-daunting chicken plucking chore into a seamless operation. Equipped with a powerful motor, high whirring speed, and 108 plucking fingers strategically placed in the plucking drum, this chicken plucker can handle up to 4 chickens in one time and pluck up to 6 chickens in one minute.
So save your fingers from the plucking drudgery and make plucking seamless and quick by getting yourself a VEVOR chicken plucker.
Happy plucking!





 Arabic
 Danish
 Dutch
Dutch English
 Finnish
 French
 German
 Hungarian
 Italian
 Norwegian
 Portuguese
 Romanian
 Russian
 Slovak
 Spanish
 Swedish