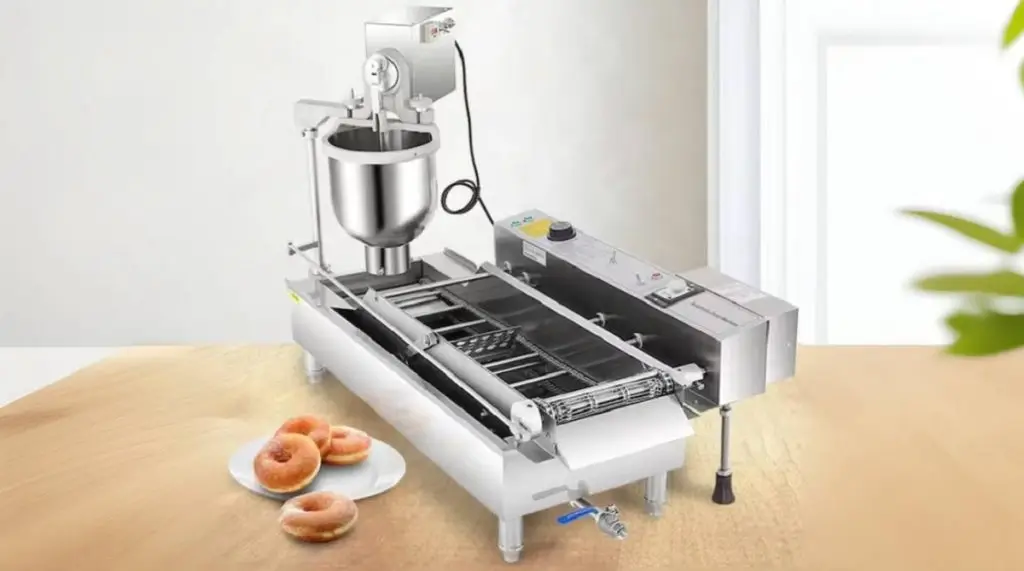
Welcome to the comprehensive guide for the VEVOR Donut Machine, an essential tool for any bakery or kitchen. This manual provides step-by-step instructions on assembling, operating, and maintaining your VEVOR Donut Machine, ensuring you create perfect donuts every time. As a part of VEVOR’s commitment to quality and efficiency, this manual reflects our dedication to providing top-notch equipment and clear, user-friendly guidance. Dive into this guide to unleash the full potential of your VEVOR Donut Machine and elevate your culinary creations.
Table of contents
I. Specifications
| Voltage | AC 100~130 V / 50~60 Hz |
| AC 220~240 V / 50~60 Hz | |
| Heating Power | 3 KW |
| Yield | 500 Pieces/Hour |
| Donut Diameter | 3~10 CM |
| Machine’s Size | 110×40×65 CM |
II. Important Safeguards
- Ensure that your power supply matches the power marked on the product. The deviation is under 10%.
- Before connecting the power, please connect the ground wire first.
! This is high-power (3 KW) equipment, so connecting a current safety device is better.
- Before obtaining access to terminals. All supply circuits must be disconnected.
- If the supply cord is damaged or the machine shows any signs of damage, it must be replaced and fixed by the manufacturer, its service agent or similarly qualified person in order to avoid a hazard.
- The electronic and electric parts must not be immersed.
- DO NOT handle roughly or drop on hard surfaces.
- DO NOT mix with other utensils in the sink when washing.
- DO NOT allow to rust. Always wash parts thoroughly. Dry completely and then lubricate with mineral oil or liquid shortening before storing or reinstalling in unit.
- DO NOT force the machine if it becomes jammed. Disassemble and remove any obstruction to prevent damage to the plunger.
- Children being supervised not to play with the appliance.
- The instruction concerning persons (including children) with reduced physical, sensory or mental capabilities or lack of experience and knowledge is not applicable.
III. Illustrations
| Symbol Description For SP | |
| Indicator | Power indicator. |
| Reset | Have counting value back to zero. |
| Attemperation | When the actual temperature value is different from the setting. Adjust the value difference by it. |
| Temperature + | Increase the heating temperature |
| Temperature – | Reduce the heating temperature |
| Timer- | Reduce frying time and transmit speed. |
| Timer+ | Increase frying time and transmit speed. |
| On/Off | Power switch. |
| Heat | It is in charge of heating. ! It is recommended within 230℃. |
| Drop | Have the donut fall down from the funnel automatically |
| Flip | Turning over the donut. |
| Auto | When the actual temperature value is different from the setting. Adjust the value difference by it. |
** Want to change the donut’s size? Please go through the following steps. This is suitable for a machine with more molds.
1. Choose the size you want to make(3~5 cm,5~7 cm & 7~10 cm)

2. Matching the mold with Funnel’s bottom, then screw it tightly.
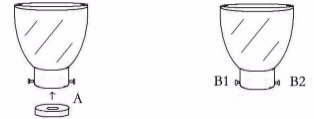
3. Screw the plunger with the matched mold.

IV. Package Includes
- 1x E- box
- 1xRod
- 1x Funnel
- 1x Fry Main body
- 1x Plunger with mold (mold’s number is according to your order)
V. Assemble Machine
- Unpack all the parts, (See IV. Package Includes)
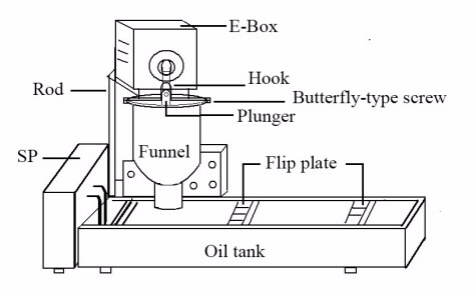
- Insert transmission bar (ROD) into Fryer’s left hold and connect transmission bar with E- box. Then hook its funnel.

- Put the plunger into the funnel, and move the plunger up and down to check whether the funnel is on the right place. If the plunger can be moved easily, it is done. Then screw tight the butterfly-type screw. Finally, hook the plunger.

VI. Operating Instruction
- Install all parts of the machine and clean it.
- Connect the power, including the ground wire. Make sure that the machine’s power requirements match the power source as specified on the machine’s data plate.
- Have all the materials prepared and pull the oil into the oil tank.
! DO NOT have the machine on heating condition when tank is dry.
The danger of fire exists if there is no oil or water in the oil tank.
! Mind the heat oil and don’t get a burn.
- Press [On/Off], machine is on power.[Indicator] is on and machine start to run.
- Press [Reset]to have counter back to zero.
- Press [Timer+] and [Timer-]to set your desired frying time.
- Press [Temperature+] and [Temperature-]to set your frying temperature.
- Press [Heat], heating is beginning. When temperature is to your desire degree, Temperature controller will be off by itself and heating pipe will stop working. When oil’s temperature degree decreases, the heating pipe will heat automatically. This will circulate to ensure temperature is within the temperature you set.
- Pull the pre-mix dough into the funnel. Press [Drop], the dought will fall down from the funnel. This can help to test the plunger’s working conndiction. If the above steps are OK with oil is heated, and you want dought to fall down automatically, press switch [Auto].
- Then you can make your delicious donut.
! If you want to stop the machine, remember to turn off switch [Heat] first.
! Stop using the machine if it is deviant. Check out its malfunction before use it again.
VII. Cleaning & Storing
- Do cut off the appliance’s power supply and wait it cooling down before cleaning.
- Do not use strong alkali cleaners such as lye, soda ash, or trisodium phosphate, these will discolor or even corrode the equipment. Wipe the appliance with soft cloth.
Never with abrasive products.
- Store it in a dry place away from corrosive substances.
- Cleaning the hopper and the plunger.
Donut Recipe For Reference
| Ingredient | Weight | Percentage |
| Donut pre-mix flour | 1,000g | 58 % |
| Water | 325 g | 18.8 % |
| Pure egg liquid | 170 g | 9.9 % |
| Milk | 10 g | 0.6 % |
| Salad oil | 220 g | 12.8 % |
FAQs about the VEVOR Donut Machine Manual
How do I set up my VEVOR Donut Machine for the first use?
To set up your donut machine, follow the assembly instructions provided in the manual. Ensure all parts are securely fit, and the machine is properly connected to a power source.
What is the best way to clean the VEVOR Donut Machine?
After use, disconnect the machine from the power source and allow it to cool down. Clean with a soft cloth and mild detergent, avoiding harsh chemicals and abrasives.
Can I adjust the size and thickness of the donuts?
Yes, the machine comes with adjustable settings for donut size and thickness. Consult the operating instructions for detailed steps.
What should I do if the machine stops working during operation?
Turn off the machine and unplug it. Check for any visible issues like jamming or loose connections, then consult the manual’s troubleshooting section.
Summing Up
The VEVOR Donut Machine User Manual is your key to unlocking the full potential of your donut machine. With clear instructions for assembly, operation, and maintenance, you’re set to produce delicious donuts consistently. Remember, regular upkeep and adherence to the guidelines ensure longevity and peak performance. Ready to take your donut-making to the next level? Explore our range of VEVOR products and find the perfect match for your culinary needs. Happy donut-making!

