Model:
B23\B23EU
B26\B26EU
B210
B312
Table of contents
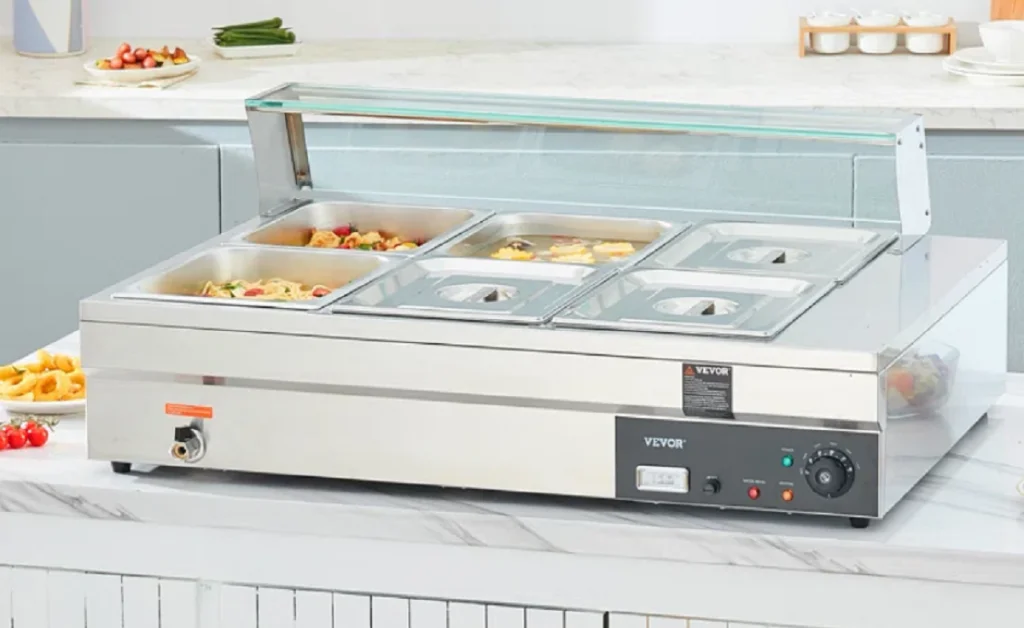
Welcome to your go-to guide for the VEVOR Electric Bain Marie Countertop Food Warmer. This manual is your key to unlocking all the features of your new kitchen ally. Ideal for professionals and food enthusiasts alike, our VEVOR food warmer ensures your dishes stay at the perfect temperature. In this guide, you’ll find everything from setting up to keeping your warmer running like a dream. Let’s get started and make your food service a smooth and enjoyable experience!
Important Safety Information
Please read the following statements carefully and understand their meaning prior to use to ensure safe operation.
 | Warning-To reduce the risk of injury,user must read instructions manual carefully |
 | This symbol, placed before a safety comment, indicates a kind of precaution, warning or danger. Ignoring this warning may lead to an accident. To reduce the risk of injury, fire, or electrocution, please always follow the recommendation shown below. |
 | HOUSEHOLD USE ONLY! |
| This product is subject to the European Directive 2012/19/EC provision. The symbol showing a wheelie bin crossed through indicates that the product requires separate refuse collection in the European Union. This applies to the product and all accessories marked with this symbol. Products marked as such may not be discarded with normal domestic waste but must be taken to a collection point for recycling electrical and electronic devices. |
CAUTION: In order to avoid a hazard due to inadvertent resetting of the thermal cutout. This appliance must not be supplied through an external switching device, such as a timer, or connected to a circuit that is regularly switched on and off by the utility.
- Improper installation, adjustment, alteration, service, or maintenance can cause property damage, injury, or death.
- Read the installation, operating and maintenance instructions thoroughly before installing or servicing this equipment.
- Do not store or use gasoline or other flammable vapors or liquids in the vicinity of this or any other appliance.
- The information contained in this manual is important for the proper installation, use, and maintenance of this product.
- Adherence to these procedures and instructions will result in satisfactory results and long-term trouble-free service.
- Please read this manual carefully and retain it for future reference.
- Do not spray the bain marie with a water hose under pressure. Do not spray liquids directly onto the control panel (refer to the cleaning section for details).
- Do not place any part of your body on bain marie lids when the unit is turned on.
- Do not operate the bain marie next to any heat source or grease emitting appliance (i.e., fryers).
- Do not use the unit for any other purpose other than holding food.
- Do not use sharp objects to activate controls.
- Take extreme care when lifting the bain marie pot lids, as steam may be expelled from hot foodstuffs. Don’t touch the tank element covers or elements when the machine is hot.
- Do not let children or minors touch or use this product (Note:This appliance can be used by children aged from 8 years and above and persons with reduced physical, sensory or mental capabilities or lack of experience and knowledge). If they have been given supervision or instruction concerning use of the appliance in a safe way and understand the hazards involved. Children shall not play with the appliance. Cleaning and user maintenance shall not be made by children without supervision)
- Please be careful during use:Do not put non-food items into the product for heating, and please use purified water
- Type Y attachment:If the supply cord is damaged, it must be replaced by the manufacturer, its service agent or similarly qualified persons in order to avoid a hazard.
Introduction
The bain marie has been specifically designed to meet the rigorous demands of a busy food service operation. Each bain marie has been assembled and tested according to strict quality standards.
Technical Specifications:
| Model No | Power | Voltage | Dimension (mm) | Plug Type | Dry burning indication |
| B23 | 1500W | 110-120V ~60Hz | 980*395*380 | NEMA 5-15F | YES |
| B23EU | 1500W | 220V-240V ~50/60Hz | 980*395*380 | European Plug | YES |
| B26 | 1500W | 110-120V ~60Hz | 1045*760*320 | NEMA 5-15P | YES |
| B26EU | 1500W | 220-240V ~50/60Hz | 1045*760*320 | European Plug | YES |
| B210 | 1800W | 110-120V ~60Hz | 1530*720*380 | NEMA 5-15F | YES |
| B312 | 1800W | 110-120V ~60Hz | 1590*760*325 | NEMA 5-15P | YES |
Installation Instructions
Please note this unit must be installed by a qualified person!
Unpacking
- Remove the bain marie and operation manual from the packaging.
- Remove all packaging materials and protective layers from the bain marine, including the plastic protective layer on all stainless steel.
- Wipe all surfaces with a clean, sanitized cloth.
- Check the unit for damage. If the bain marie is damaged, notify your distributor immediately.
Installation
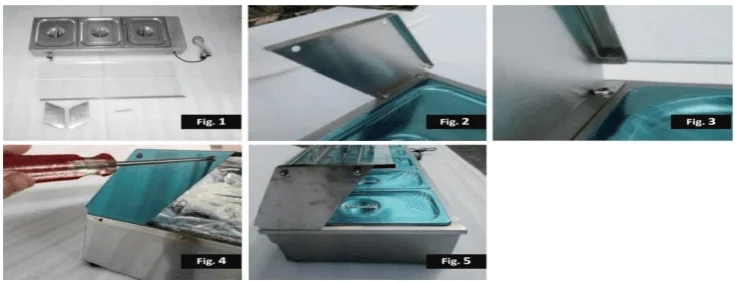
- Remove all components from shipping container. (Fig.1)
- Using the screws secure the right & left parts on the tank body. (Fig.2)
- Put one piece of glass into the hook of the right & left parts. (Fig.3)
- Put the 2 long poles into the holes of the right & left parts. And put another piece of glass between the long poles and the right & left parts. Secure the 4 screws. (Fig.4)
- Bain Marie is ready for use. (Fig.5)
Operating Instructions
The unit must be connected to a power point with a compatible power rating.
- The unit is equipped with a heating element. Add adequate water inside the tank.
ATTENTION: check the water level inside the water tank from time to time and make sure that the water level is between “MIN” and “MAX” especially when selecting a high temperature,to prevent the heating element from dry burning.
- Rotating the thermostat knob. Do not use the distiller until the preheat cycle is complete, as you will not achieve optimal product retention.
- Place the cooked or heated product into the food pan of the gas stove and place into the bain marie tank.
- Cover the pans with correct gas stove lids to suit.
- Keep close attention to the temperature of the food product. If the product is too hot, it will dry out; if it is too cold, it will deteriorate.
- Dial thermostat models -adjust the thermostat by rotating the dial to desired temperature.
Cleaning
To maintain appearance and extend service life, the bain marie should be cleaned at least daily.
- Before cleaning or moving, unplug the unit and let it cool completely.
- Carefully empty the water from the well.
- Wipe the entire well interior with a clean, damp cloth.
- To avoid damaging the well finish, do not use abrasive materials, scratching cleansers, or scouring pads to clean water deposits from the well.
- If soap or chemical cleaners are used, be sure to rinse them off completely with water immediately after cleaning. Chemical residue could damage warmer.
- Every two hours, remove pan and check the water level.
DO NOT IMMERSE BAIN MARIE IN WATER OR OTHER LIQUID.
DO NOT SPRAY WITH WATER OR CLEANING PRODUCT. LIQUID COULD ENTER THE ELECTRICAL COMPARTMENT AND CAUSE A SHORT CIRCUIT OR ELECTRIC SHOCK.
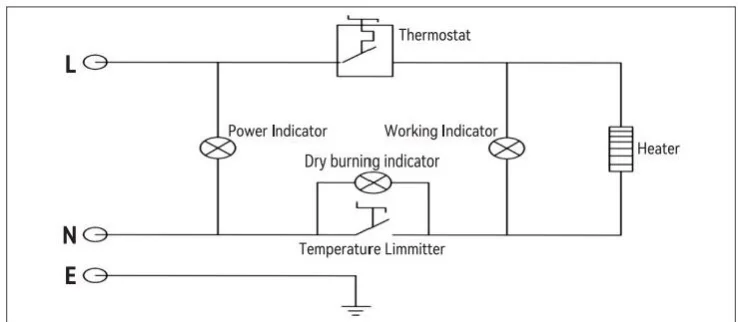
Wiring Diagram
Troubleshooting Chart
If a problem occurs that does not appear on this table, stop using the bain marie and seek help from the manufacturer, a qualified technician or an authorized dealer.
Temperature safety reset switch
The unit is equipped with a switch that cuts off power if there is not enough water in the tank to cover the heating element. This switch has a manual reset. The reset switch and cover is usually located on the front panel of the unit. Determine what caused the safety switch to activate and correct it. Possible causes include: dirty water, low water level and element not properly submerged in water.
To reset the temperature safety switch, follow the 4 steps below:
- Wait until the oil has cooled to 120°F(50°℃)or below.
- Remove the switch cover by unscrewing the cover counterclockwise.
- Use a pen or similar narrow tool and press the reset button down. The button should stay in the down or in the set position.
- Put the switch cover back in place and tighten it clockwise to fix it.
Other Possible Shooting Chart
| Issue | Potential Cause | Solution |
| Unit is too hot | Temperature control is set too high | Change the temperature to a lower setting |
| Unit is connected to incorrect power supply | Contact an authorized electrician | |
| Defective internal thermostat | Contact an authorized electrician | |
| Unit is not hot enough | Unit has not had enough time tc preheat | Allow unit 30 minutes to reach operating temperature.This can be accelerated by closing the drawer vent(s) |
| Temperature control is set too low | Change the temperature to a higher setting | |
| Defective internal thermostat | Contact an authorized electrician | |
| Water level is low | Fill well with warm/hot water up to“MAX”fill line | |
| Unit is not working at all | Unit is not plugged in | Plug unit into proper power supply |
| Unit is not turned on | Press the On/Off switch on the digital control | |
| Circuit breaker tripped | Reset circuit break | |
| Control knob is defective | Contact an authorized electrician | |
| Heating element is burned out | Contact an authorized electrician |
FAQs about VEVOR Food Warmer Instructions
Q1: How do I set up my VEVOR Electric Food Warmer for the first time?
A1: Begin by carefully unpacking and removing protective materials. Ensure all components are intact, then follow the detailed installation instructions provided in the manual.
Q2: What is the best way to clean my Electric Food Warmer?
A2: Unplug and let it cool before cleaning. Wipe the interior with a damp cloth. Avoid abrasive materials and ensure to rinse off any soap or cleaners thoroughly.
Q3: My Food Warmer isn’t heating properly. What should I do?
A3: Check if it’s plugged in correctly and the thermostat is set to the desired temperature. If issues persist, consult the troubleshooting section or contact technical support.
Q4: Can I adjust the temperature of the Food Warmer?
A4: Yes, you can adjust the temperature using the thermostat knob to suit your specific food warming needs.
Q5: What safety precautions should I take while using the Food Warmer?
A5: Always read the safety instructions. Do not operate near flammable substances, and ensure it’s not used by children without supervision. Regularly check the water level to prevent dry burning.
Final Words
Your VEVOR Electric Bain Marie Food Warmer is more than just a kitchen appliance; it’s the key to keeping your culinary creations just right. With this guide, you’re all set to use, maintain, and troubleshoot with ease. Eager to step up your food game? Check out the VEVOR Electric Food Warmer and experience the blend of convenience and quality. Happy cooking!

