Learn how to use your VEVOR Heat Press properly with our comprehensive VEVOR Heat Press Instructions. Whether you’re a seasoned user or just starting, our user-friendly guide is designed to simplify the process, ensuring you maximize efficiency and achieve flawless results.
Read our step-by-step instructions and gain insights into advanced techniques that elevate your heat press game. This manual goes beyond the basics, giving you the confidence to create stunning designs effortlessly. Along the way, we will highlight essential safety measures and address frequently asked questions to ensure your heat press process is safe and efficient.
So, let’s get started.
Note: Warnings must be followed carefully to avoid body injury.
Table of contents
Transfer Parameter(for reference)

Main parameters
| Product Name | Multifunctional heat press machine | Rated voltage | 220V~ | 110V~ |
| Item No. | P8038 | Rated frequency | 50Hz | 50-60Hz |
| Highest temperature | 210℃ 410F | Rated power | 1200W | 1000W |
| Transfer size | 380*380mm | Length of the cable | 1.5 M | |
| Packing size | 580*535*420mm | Mug heat press machine power | 280 W | |
| Cap heat press machine power | 150W | Pen heat press machine power | 160 W | |
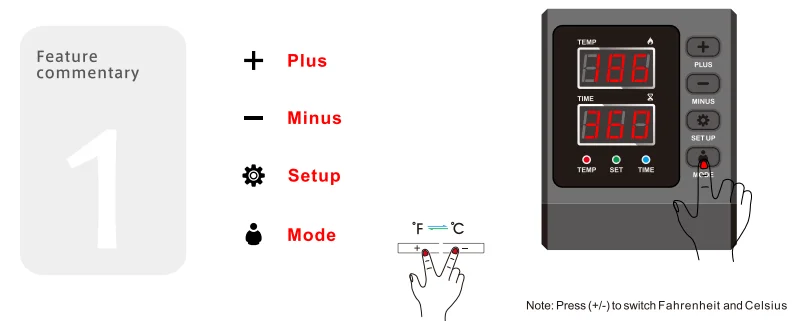
1. How to turn on/off and how to start?
Press the switch button on the side of the thermostat to start the machine.
Press once to count down and press again to reset.
2. How to set the temperature/time?
Press once to set the temperature, press twice to set the time, and press again to exit. (It will automatically exit the temperature/time setup state in case of nooperation within 5sec.).
3. How to set the temperature/time to increase or decrease?
Set the time/temperature increase
Set the time/temperature decrease
4. How to change the temperature unit from ℃ to F?
In the power-on state, press “+” and “-” at the same time to change the temperature unit between ℃ and F.
5. How to set auto shutdown time?
Press and hold for 5 sec.to set the auto shutdown time.
(The factory default is 60min and the range is from 10min to 120min)
6. How to do temperature correction?
Press and hold for 5 seconds to enter the temperature correction setting. (Range±30℃,initial value is 0)
7. How to turn on /off the beep sound?
In the shutdown state, press “-“to turn off the sound and OFF is shown;
Press again to turn on the sound and ON is shown.
Tips: The max. set temperature of this machine is 210℃ and the longest time is 999sec.
Accessories installation diagram
Please perform all operations after power off
Plate transfer process

- Select one side that matches the size of the plate to be sleeved with a silica gel pad, and remove the silica gel pad on the other side; Keep the side without silica gel pad facing upwards and heat it on the machine for 15 minutes;
- Put the hot stamping paper on the plate that wants to print the pattern.
- Remove the heating plate and place it on the plate, keeping the side without the silica gel pad facing upward.
This mug heat press machine is matched with 5 in 1 and 6 in 1.

Connect the cap baking machine to the main machine and set the time and temperature
Stick the transferred picture on the hat.
When the temperature reaches, place the hat into the hat baking machine and press tightly.
This mug heat press machine is matched with 8 in 1,10 in 1,11 in 1

Connect the cap baking machine to the main machine and set the time and temperature
Stick the transferred picture on the hat.
When the temperature reaches, place the hat into the hat baking machine and press tightly.
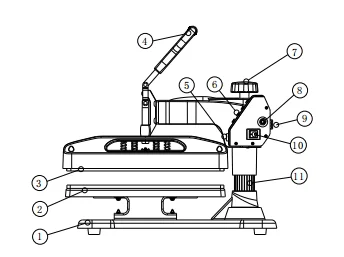
Main spare parts
- Pedestal
- Placement
- Heating plate
- Handle
- Aviation connector
- Button
- Lift Knob
- Overload protector
- Power socket
- Power switch
- Column
Guarantee
The products are strictly based on the Consumer Protection Law of the People’s Republic of China and the Product Quality Law of the People’s Republic of China.The services are as follows:
Within 12 months,this product has the performance failure listed in the “Product Performance Failure Table”.
It is confirmed by SUNMETA and can be used for maintenance service free of charge.If out of validity,damage caused by force majeure,or human causes,the machine is not covered by the warranty,repair in charge.
Safety instruction
Before operating this unit, please read these instructions completely and save them.
Notice
- Keep unplug when moving the machine
- Keep unplug when installing accessories
- Place on a flat and stable platform and operate under ventilated conditions
- Wear special protective equipment when operating the machine
Warning
lmproper use may result in electric shock, fire, personal injury, and other damage.
- Do not use this machine in a hazardous location
- Do not use it when the machine is not working properly.
- Do not allow children or adults who do not understand this manual to operate this machine.
- Do not disassemble and repair this machine.
- Do not use an unsuitable AC outlet.
- Do not touch the heating plate when the machine is heating.
Warranty Content
Product Performance Failure Table
| Machinebody | Parts of the machine itself(excluding main parts) | One year | Fault 1 | The machine cannot be used normally according to the operating procedure |
Main parts | 38*38mm aluminum alloy heating plate | One year | Fault 2 | Heating plate not heating |
| PCBA(circuit board) | One year | Fault 3 | Display error | |
| Mug heating element | 90days | Fault 4 | Failure heating | |
| Pen heating element,cap heating element | One year | Fault 5 | Failure heating |
Circuit Board Wiring Method
- Cables on the motherboard and display
- NTC temperature probe
- Hot plate
- Main incoming line
- Heating plate zero line
- Main incoming zero line
FAQs about VEVOR Heat Press Manual
1. How do I know what temperature to set my heat press at?
Finding the optimal temperature for your heat press depends on your working material. Consult the material specifications or garment tag for recommended settings. Our VEVOR Heat Press Manual includes a comprehensive temperature guide to ensure you achieve the best results every time.
2. Do you leave the heat press open when heating up?
Yes, always keep the heat press in the open position during the heating process. This ensures even heating and prevents any potential damage.
3. How do I change my heat press settings?
To adjust your heat press settings, consult the control panel on your VEVOR Heat Press. Navigate through the temperature and time settings using the intuitive interface. Our manual provides detailed instructions, guiding you through the simple process of customizing settings to suit your project needs.
4. How long do you heat press a shirt?
The recommended settings for pressing a shirt on the VEVOR Heat Press are 390°F for 60 seconds. Achieve professional-quality transfers by adhering to this time and temperature combination.
5. What is the max temperature on the VEVOR heat press?
The VEVOR Heat Press offers a maximum temperature of 210°C (410°F). This versatile range allows you to work with various materials, ensuring your heat press meets the demands of different projects.
Conclusion
Our VEVOR Heat Press Manual is your gateway to a world of limitless creativity and precision. Whether you’re a beginner or an experienced user, our manual will simplify and elevate your heat press experience. You’ll learn about the basics and advanced techniques, gaining confidence with each page. Our guide will help you transform ordinary materials into extraordinary creations.
Join us on this exciting journey of craftsmanship, where precision meets creativity. Follow our VEVOR Heat Press Instructions and let’s create a masterpiece together! We’re excited to see what amazing things you’ll create.


 Arabic
 Danish
 Dutch
Dutch English
 Finnish
 French
 German
 Hungarian
 Italian
 Norwegian
 Portuguese
 Romanian
 Russian
 Slovak
 Spanish
 Swedish
Simply desire to say your article is as surprising. The clearness in your post
is simply excellent and i can assume you are an expert
on this subject. Well with your permission allow me to grab your RSS
feed to keep up to date with forthcoming post. Thanks a million and please
keep up the rewarding work.
I’ve been exploring for a little for any high-quality articles or weblog posts on this kind of space .
Exploring in Yahoo I finally stumbled upon this web
site. Reading this information So i’m satisfied to exhibit that I
have a very good uncanny feeling I found out just what I needed.
I most definitely will make sure to don?t omit this site and give it a look regularly.
Great post but I was wondering if you could write a
litte more on this topic? I’d be very thankful if you could
elaborate a little bit further. Bless you!
Clear instructions, made my first press seamless and successful!
Nice answer back in return of this question with real arguments and explaining all concerning
that.